It's been an age, I haven't posted anything. I've been back to Luanda and then again back to philippines, been very busy on our move to another country. But it doesnt mean I stopped cooking. Just didnt have the time to post, coz got some projects to do at home.
Cheers!
Friday, August 11, 2006


Wednesday, January 18, 2006
Off to Philippines
You might be wondering why I'm too slow these days with my posts... It's because I got loads to organize in my mind thats taking too much time instead of blogging... so, I'll be off for vacation tomorrow, I hope I could blog from there,, I know I'm short of blogging time as there will be so much fun here, there, and everywhere. Apart from that, when I'm in Phil, I'm not totally on vacation as I got some chores to do.. projects to execute etc.
I'll make up when I'll come back! promise! I'll try to dig some exotic foods and maybe recover some lost recipes, or maybe make a twist out of them.
I've gotta say.. "Its BEACH time"...
Cheers!
I'll make up when I'll come back! promise! I'll try to dig some exotic foods and maybe recover some lost recipes, or maybe make a twist out of them.
I've gotta say.. "Its BEACH time"...
Cheers!
Tuesday, January 17, 2006
Chocolate mouse

I would have been proud if I made this, but no! its the instant mouse in a pack. All you have to do is add the pack of powder into a bowl of milk and whisk until stiff.. Topped with whipped cream. It's a good alternative though, for an instant dessert.
My husband is making good chocolate mouse. I should have took a picture of that instead.
Monday, January 16, 2006
Grilled Fish with Roasted Pepper Salad

For me, this is perfect healthy meal.. Taste wise? The best!
This is my first entry for "Weekend Herb Blogging" hosted by

Place the pepper on top of the stove burner and keep the flames on until the skin of the pepper turns completely black.

When I say black means the skin is totally burned, charred and blistered.
Turn the pepper occasionally using a tongs as necessary to burn other parts of the pepper. When it turns completely black, it means its done. All you need to do is peel off the burned skin. Literally, remove all the blackened skin. This is quite a chore, but I guarantee the taste is exceptional.
While they are still hot, cover or place in a paper bag for 15 minutes and allow the steam to loosen the charred skins. Peel off the skin over a bowl to catch the juices, and use it for the salad. The skin will just fall off easily. Cut the pepper into half and remove the seeds. Slice the peppers into thin strips.
To make the vinaigrette, simply mix all ingredients and stir until thick.
Mix the vinaigrette and pepper; chill for 20-30 minutes. This can be made ahead of time and store in the fridge and serve when needed.
Here, I served with grilled fish and bread.
Facts about bell peppers
Bell Peppers are rich in vitamins A and C which are known to be anti oxidants. Antioxidants are a group of nutrients that neutralize free radicals in the body fluids reducing the risk of diseases.
Free radicals are naturally produced when the body uses oxygen. Unless they are neutralized, they cause cell damage, which may lead to health problems such as arthritis, heart disease and cancer. A single raw red pepper, sweet or hot, can meet the daily requirements for two important antioxidants, vitamin A and C.
Tuesday, January 10, 2006
Baileys

BAILEYS is a natural marriage of fresh Irish cream, the finest of spirits and Irish whiskey
I like the sharp and creamy taste of this Irish Liqueur. I like it chilled or with ice and I love it with coffee. Thanks to hubby who gave it to me.

Here’s a recipe of an Irish Cream Frappe from my sister Dels.I tried to make one myself.
Irish Cream Frappe
1 cup espresso coffee
2 jiggers milk
1 jigger chocolate syrup
1 jigger sugar syrup
1 jigger Irish Cream (Baileys)
1 scoop vanilla ice cream
Blend all ingredients and top with whipped cream.
Check more recipes of Baileys mix, check www.baileys.com
Thursday, January 05, 2006
CAIPIRINHA

Caipirinha
“CACHAÇA” (pronounced as ca-sha-sa), which is spirit distilled from sugar cane, an essential ingredient for caipirinha. This popular Brazilian drink is very easy to prepare. I love caipirinha and I always have some CACHAÇA at home, I’m not drinking it everyday but I feel like having some from time to time and I like to serve it for visitors as an appetizing drink served with some chippies and olives.
For 1 glass of caipirinha:
2 pieces lime
2 tablespoons sugar
1 glass finely crushed ice
1 shot of CACHAÇA
Cut off the ends of the lime with the white pitt and slice into two. Remove the white pitt at the center of each slice and cut into 2 parts. Litterally cut them into quarts without the bitter pitt at the center of the lime. Place the lime into a glass and add sugar; combine two ingredients by crushing with pestle until well combine and juice of the lime is well mixed with sugar. Add finely crushed ice and CACHAÇA; shake the mixture with a shaker. Pour back to the glass and serve.
Cheers!
For information how to make CACHAÇA, check this out:
CACHAÇA
French Cheese: Epoisses

Epoisses
I’ve been itching to write about cheese before and eventually my interest in writing about it faded because I am confused with all kinds of cheeses. Not until last night we had this (super baho) very smelly cheese that itched me again to write about cheeses. I find the smell so awful but at the back of my mind I am so curious to challenge myself to taste it and eventually like it. First bite, I said it smells like patis (fish sauce); second bite, I said it smells like dried squid, and there was the third bite, I am savoring its succulent flavor of the cheese.. and there was fourth and on and on… behind that awful aroma tastes a pungent and succulent taste. But hey, you need something else to balance its taste and get rid of the smell. And of course, we didn’t eat cheese alone. We ate it with bread. The more I tasted it the more I liked it and I ended up asking; What is this kind of cheese? Which region in France does it come from? Are all smelly cheeses good? Okay, I think I’ll blog on it.
I am totally ignorant when it comes to cheese and all its kinds (there are hundreds of them) and I am confused with their names and their smells but I find this distinct aroma and taste unique. I’ve tasted some that hubby grabs from the French shop in town. I’m starting to like each kind. Of all the cheeses I’ve tasted this one stinks but tasty after a few bites. I’m starting to like it as well.
In terms of wines that complement certain cheeses, I know nothing about it,but the wine we had works so well with the smelly cheese. It is called “DEFESA” , red wine and product of Portugal. It is spicy red wine. I like its taste as it clears my mouth after having some epoisses.
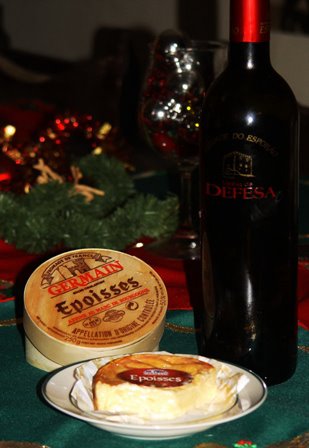
I think I need another section in my blog huh! "Cheese" I'll think about having a go for it. Things that I know nothing about except eat them and drink them. I'm talking about cheese and wine. Hmmm?? I dont know yet if I'll blog on them, could be interesting. My French husband is very influential in food as well as he is influenced with Filipino foods.
For more information about epoisses, click
here.
Monday, January 02, 2006
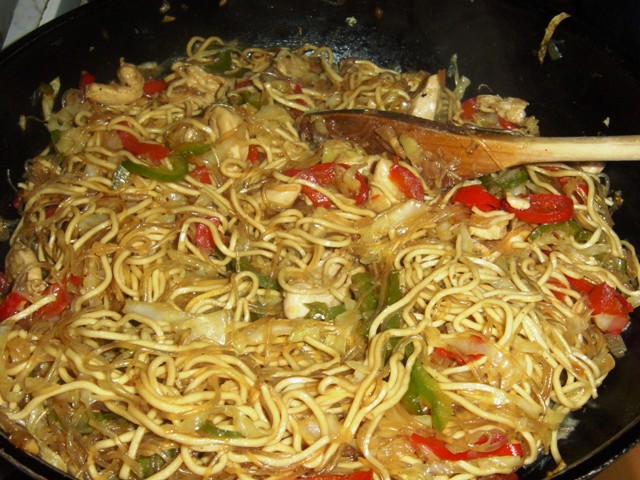
Bam-i
Bam-i
In Visayas region of Phil, we call this dish Bam-i, but for Northern part of Philippines, they call it pansit. Whatever we call it, it doesn’t matter the fact is this is a very common dish in my country. Be it an ordinary dinner, indoor or outdoor party or picnic, Bam-i is almost present among the dishes.
Bam-i is made of 2 kinds of noodles, egg noodles and vermicelli noodles or sotanghon stir fried with meat and vegetables. Vegetables may vary depending on what we have at hand. Now, I’m not in Phil., but I’m missing this dish and I have to settle what I have in my kitchen.
One thing very essential in preparing this dish is timing. The noodles and vegetables should cook together. The noodles get easily overcooked they tend to stick to the pan. To avoid this, I came up with another way of doing it by blanching the noodles in a boiling stock to get rid of extra starch. This will prevent the noodles from sticking together.
Ingredients:
2 large onions (finely sliced)
2 cloves garlic (finely chopped)
2 Tablespoons oil
2 chicken breasts (sliced in strips)
1 red bell pepper (sliced in long strips)
1 green bell pepper (sliced in long strips)
2 cups shredded cabbage
6 Tablespoons light soy sauce
2 teaspoons dark soy sauce
2 teaspoons oyster sauce
1 liter stock or water
2 Tablespoons freshly ground pepper
1 pack egg noodles
½ pack vermicelli noodles or sotanghon
Procedure:
1. Prepare a wok or pan and casserole.
2. In the pan, sauté garlic and onions in 2 Tablespoons oil until translucent.
3. Add chicken breasts and cook until done; add peppers, oyster sauce, light and dark soy sauce.
4. Meanwhile, at the same time, in another casserole, bring to boil 1 liter of stock or water. Blanch shredded cabbage for 1 minute and add to the other pan.
5. Add vermicelli noodles to the boiling stock and cook until just done. Using a slotted spoon, drain the noodles leaving excess starch and water, add noodles directly to the sautéed garlic, onion and chicken stirring occasionally.
6.Add the egg noodles to the boiling stock in the casserole and cook for 2 minutes until just done. Drain egg noodles and add to the pan with vermicelli noodles. Mix vigorously cooking in a moderate fire. Add a ladle of stock to the pan and toss everything to combine all the flavors. Add freshly ground black pepper.
Friday, December 30, 2005
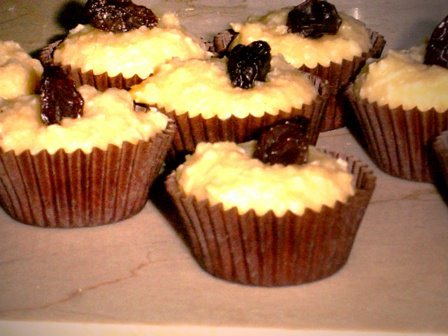
Coconut Macaroons
Coconut Macaroons
Quick and easy dessert to make. Mix dessicated coconut, condensed milk and flour. Some don’t add flour but I find it too sweet. To make it light, I added flour this time.
Ingredients:
2 cups dessicated coconut
1 cup condensed milk
½ cup flour
raisins
Mix the ingredients thoroughly and spoon into small paper molds. Add raisins on top of each and bake for 10 minutes at 200 degrees C.
Tuesday, December 27, 2005
xmas desserts

Christmas cake
I am using the same cake stand I’ve made last year, but it looks very different from that of last Christmas. Last year’s Christmas cake is here.
This time, I put candies all over the round stem of the stand. They are very cheap candies that are nicely wrapped strawberry prints and with green stem. So, I took advantage of sticking them using a scotch tape to accent Christmas colors. Kids had fun taking them out during the party, which its made for the purpose. At the base side, I made some macaroons that anyone can pick and have a taste of this coconut dessert.

Berries with whipped cream
Got a handful of berries of each kind and played with its presentation. This time I got strawberries, raspberries and blueberries. I think they look gorgeous sitting in a base. How to make the base? Good you asked. It is just as simple as learning your ABC. It is made of pound biscuits mixed with softened butter and molded into a desired shape. If you like to add a kick to it, just add a splash of whiskey.

And look.. they look stunning in layers too!
I'm just having fun with berries :-)
Friday, December 16, 2005
Weekend Dog Blogging

It seems like human chair is too small for my dog! :-)
Participating the "Weekend Dog Blogging" hosted by Sweetnicks. This weekend's photo must include food! Which is why I treated my dog with vanilla ice cream. He loves icecream too! It's a nice treat for him, well he always have some bits, anyway.
Vanilla Ice Cream with chocolate syrup

Vanilla icecream with chocolate syrup
Another icecream recipe? yes, I know I have posted different flavors of icecream but this is my first time, but what I love with this is the "real vanilla pods". it's my first time to use real vanilla pods and they are really really great! I think its a lot more better than comercial ice cream!
Basic Ice cream recipe
2 eggs
250 ml full cream milk
100 g sugar
450 g whipping cream
Flavoring at your own choice (i used vanilla pods)
Procedure :
Make the custard:
Warm milk in a small pan whilst whisking the eggs and sugar in a separate bowl. Slowly pour the warm milk into the egg and sugar mixture, stirring constantly. Pour this all back into the pan and heat the mixture. stirring constantly, until it begins to thicken slightly but do not let it boil. Add vanilla and set aside for a few minutes. Pass through a sift and discard the vanilla pods. Allow it to cool down to room temperature and chill for 30 minutes.
Beat the whipping cream until soft peak. Fold-in the custard mixture.
Pour the mixture into an icecream maker. Alternatively, if you dont have an icecream maker, freeze the mixture and stir occationally like every 30 minutes just before it would turn into solid to avoid crystalized icecream.
Thursday, December 15, 2005
Smoked Salmon Battleships

Smoked Salmon battleship
When I made this, I didn’t know what I put myself into. I intend to follow the recipe of Susie Donald’s “Quick & Easy sushi and Sashimi” mini cookbook. The recipe says preparation time is 20 minutes and assembling time is 15 minutes. However, for me it took me 2 hours to do this. At first I was enjoying having the things in my working place. I find it very hard to shape the sushi rice into small oval shape. Anyways, while I was doing it I thought of setting up the table in Japanese style with chopsticks. Well it wasn’t realized at all because we ended up eating at the working table coz it took me too long to make these battleships and I was quite exhausted. So forget about the set up! It is far difficult than I thought. Roll up sushi is a lot easier than these battleships. Anyhow, blame it on my taste buds! They love to wander around the world by having a taste of every corner! Okay! Confession: I love Japanese foods and this is just one of my attempts trying Japanese cuisine at home.
I served it with pickled ginger which is optional.
Ingredients:
6 strips smoked salmon
2 teaspoons mayonnaise
¼ teaspoon wasabi paste
½ teaspoon freshly ground black pepper
2 cups cooked Sushi rice
4 sheets nori, toasted and cut into 1 inch strips
1 cucumber
Procedure:
Dice smoked salmon into small pieces. Mix mayonnaise with wasabi paste, add the diced smoke salmon and add freshly ground black pepper; set aside. Slice cucumber thinly and place it on kitchen paper then pat dry to remove excess moisture.
To prepare sushi rice, see my old post of crab sushi here.
Take 1 tablespoon of sushi rice and form into an oval shape. Place the rice oval on a flat surface and wrap a strip of the nori around its sides, leaving the top and bottom uncovered. The nori should be about 1 cm ( ½ inch) taller than the rice. Spoon the prepared salmon filling on top of the rice and assemble cucumber on top of the salmon like battle ships.
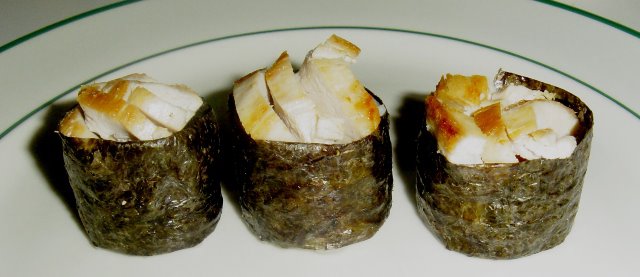
I also made chicken battleships at the same time. Grilled chicken breasts. I just added wasabi paste and mayonnaise on top of the sushi rice and arranged the chicken breasts on top like battleships.
Everything was great except that I spent long time preparing small stuffs! In short, good foods can not be rushed!
Subscribe to:
Posts (Atom)

Popular Posts
-
 The other day, I remembered the chiffon cake recipe I once knew by heart way back when I was in High School. It has been a while I haven’...
 -
 I love carbonara. It doesn’t look very glamorous on the table yet, it really has mild flavors that just melt in my mouth. Ingredients:...
 -
Welcome to my Kitchen... This is a learning page for cooking enthusiasts like me. I am keeping this journal to keep record of the things I d...
