Looking for Something? Search here:

Showing posts with label International Dishes. Show all posts

Saturday, September 20, 2014

PAVLOVA No. 2 with summer berries (strawberries,raspberries,blueberries and blackberries)


Pavlova

I have made pavlova before and is posted here: Pavlova recipe with a little bit of a famous history of the dessert.  Please read on a bit there if you like the to get the recipe.  

For this version, I didn't use whipped cream because, I just don't have it in the fridge, the thought of making it just came up quickly to compliment Hubby's lunch.  He had been working hard prepping for weekend lunch so, to equate the effort I came up with pavlova dessert as i happen to have the summer berries for the season on sale in the grocery store.

So i didn't have whipped cream to top it with, hence i just made custard and made it a little bit thicker than usual.  

I just think its easier to make meringue the night before you need the pavlova and leave it in the oven.  Put the oven at 250 degrees C, put off before putting the meringue in and leave it there till morning.  Pls avoid opening the door to check as the temperature would be affected.

I took some pictures for a guide.
Make the meringue:
Ingredients:
4 egg whites
1 pinch cream of tartar, (alternatively salt can be used)
2 tsp. vinegar
1 ½ cup sugar
2 tsp. corn starch
1 tsp. Vanilla essence


Procedure:

1. Preheat oven to 180 degrees C. (Gas 4)
2. Cut baking paper into 5 inch squares (make 6 squares)
3. Draw a circle at bottom side of the baking paper. Use this as a guide when you put meringue in each portion. Set aside.
4. In a dry clean bowl, place the egg whites and cream of tartar.
5. Beat the egg white using electric beater until soft peak
6. gradually add sugar whilst continue beating until 
7. Add vinegar and cornstarch
8. Add vanilla essence
9. continue beating until stiff. The meringue must look smooth, silky and holds a stiff peak when you lift the beater.
10. In the prepared baking paper, spoon in the meringue making a circular pattern as per the guide, working from the center, create a small well and spread the meringue to the edge of the pattern. 
11. Pipe around the meringue to create a little well, where you will put the whipped cream later on.
12. Bake for 1 hour and half. Turn the oven off and leave the meringue to cool completely inside the oven. It is best to do this at night and leave the meringue in the oven overnight. The meringue should be firm and crisp.
13. Store the meringue in an airtight container until you will use them.


Spoon the meringue on a lined baking sheet and make a well in the middle but not
going through the bottom.  Leave room for a base.


It will look like this.  A base with a little room for the the topping.  

I made some spiky just for fun.


Making the custard is taking forever.  I just wish I had whipped cream and it
will be finished in a flash, but i unfortunately dont have.  But this is worth a trial for
flavor combination.  It was good. its just that it takes forever, but its worth the wait.


The final Look.

Review:  I would say, it was a good experiment on the flavor.  The making of the custard took forever to thicken, but the taste is phenomenal compared to whipped cream.


PS.  I love the meringue.  I took the extra bit to go with my morning coffee.  It reminds me of those meringue kisses when i was a kid.  Not so sweet, crispy outside and it turns chewy and mallowy in the tongue.

Wednesday, March 16, 2011

Tiramisu


TIRAMISU


make the swiss roll and leave it in the oven
until it cools down to room temp. Do not roll it up
Tiramisu is a famous Italian dessert made of layers of coffee soaked savoiardi biscuit (popularly known as Lady Fingers)or sponge cake and eggs mixed in whipped cream with mascarpone cheese. 

Warning:  This Contains Alcohol.  Not suitable for minors! however, alcohol can be omitted if desired.

Hundreds of tiramisu recipe are around the internet to choose from, but I personally prefer the one that doesn’t contain raw eggs.  As part of the tiramisu evolution, hence this is my home made version.

Making this tiramisu is a result of a frustration from what I bought from a cake shop, which I thought tastes heavenly as it looks.  Actually I bought it for Hubby hoping it would make him feel better as he wasn’t in good shape that day, but was so disappointed with that heavenly looking tiramisu.  That challenged me to make tiramisu on the weekend. There’s nothing better than making something the way you like it.

SWISS ROLL, which is never rolled. Cut into the same
width of the pan.
line the pan with aluminum foil for easy removal of the cake

I’ve searched a lot of tiramisu recipe but most of them have raw eggs, which I wasn’t keen to eat raw eggs on the cake.  I have got a good recipe from a friend with egg too but cooked, so I was supposed to give it a go but couldn’t find mascarpone.  Anyhow, I have found an easy recipe in epicurean.com but the portion is in goblets; which is not the kind of serving I have in mind.  I like that perfectly rectangle or square slice which you can see layers of goodness in it, topped with dark cocoa powder.  That is exactly the picture of tiramisu I have in mind.  The one I was addicted to in Rennaissance Hotel – Mumbai.  They serve a real slice of heaven for me.

Most of the home made tiramisu are placed in a dish. Though it tastes good, it lacks the element of presentation when you serve a slice.  It just gets disintegrated specially for left-over.  You don’t see the beauty of it unless you have that slice on your plate which is somehow deformed by the time you like to take a bite. My point is, even if things are home-made, you can make it look as appetizing as the commercial ones. And why not? “The Eyes eat first” according to a friend.

Spoon over coffee mixture onto the cake
(this is the middle layer, the layers at the bottom
are cake,cream and cake again, cream will be the
last layer
So, it takes a little cake engineering  (winks J) to achieve that precise layers of cream,coffee,cocoa and cake, I’ve got to make my own cake that would work well with the flavors.  I think swiss roll recipe would go with it because it’s dry, spongy and tastes close to lady fingers which is the authentic ingredient for tiramisu. This time, I didn’t roll it.  I kept it flat and let it stayed a little bit longer in the oven until it cooled down to room temp.  The best thing is, it is so quick and easy to make and I am sure it is at least half the cost of that pack of lady fingers. 3 minutes of mixing and 10 minutes of baking, that’s what it takes.

Sprinkle cocoa powder on top of the cream layer
The proportion of the ingredients of this tiramisu is just by luck, I crossed my fingers at the beginning if it will work or not on actual; because it works in my imagination only.  And luckily it did, that’s why I’m itching to post this for reference before it gets off my mind.  Which is the purpose of this kitchenjournal.

Note, I added cognac because me and hubby loves it, and I didn’t had the time to look for a coffee liquor.  Therefore, this tiramisu contains alcohol.  You may skip this ingredient if you intend to serve to kids. (I just told my 3 daughter that it is spicy and its only for mommy and daddy.  She is not keen on cocoa powder, its bitter for her).

After Chilling for atleast 4 hours,Remove tiramisu
 from the pan and ready to be sliced
For sure I will be visiting this post every now and then because this will be my basic proportion as it has proven its deliciousness.  Honestly, this tiramisu vs. cheese cake is a close call to us couple. It’s tough to judge which one is faved. I voted TIRAMISU, my other-half is still undecided but indeed he admits that the two cakes are rivals as to our taste.

The recipe:
Yields two 4x4x8 loaf pans

Swiss Roll
3 eggs
1/2 cup caster sugar
1 cup plain flour
1 tsp. baking powder

Preheat oven to 180 degrees C. Line a baking tray with baking paper. Whisk the eggs until pale and soft peak forms, continue beating while adding the sugar teaspoon by teaspoon.sift together flour and baking powder and fold-in into the egg mixture using a wooden spoon.  Pour the cake mixture into the prepared tin and then smooth the surface, being careful not to press out any air. Bake in the center of the oven for 12-15 minutes.  To test if cooked,lightly press the center of and if it springs back, it is done.  Turn off the oven and leave it there until the oven cools down.  You must have a crispy crust and pungent spongy texture in the middle.


cover the sides of the remaining tiramisu with plastic
before storing it in the fridge. This will keep the cream
from absorbing odor and bacteria in the fridge.
400 g cream cheese
400 g. whipping cream
1 cup icing sugar (sifted)
cognac (optional)
cocoa powder
1 cup espresso coffee

Make the swiss roll, but don’t roll it up, just let it cool down in the oven until at room temperature.  Cut it according to the size of your dish or pan, in the picture, I’m using 2 loaf pans; so I cut 4 rectangles.

Whip the whipping cream until soft peak, add icing sugar slowly whilst continue beating until stiff.  Do not over-whip the cream; it will turn into lumpy butter! Place the whipped cream in the fridge while preparing the other ingredients.

Beat cream cheese with an electric mixer until soft and creamy; add in cognac (optional) until well blended. Fold-in the cream cheese to the whipped cream until well combined.

To assemble:


Place a foil on the pan contouring the shape of the pan and overlay at least half of the opening of the pan. Place 1 slice of  the cake at the bottom, spoon over coffee mixture evenly on to the cake. (if the coffee is still hot, let it cool down before adding the cream). Add cream mixture and evenly push it gently with the back of a spoon to make a layer of cream. Sift cocoa on top of it. Add another layer of cake soaked in coffee, add another layer of cream and lastly dust the top with cocoa powder. Cover the cake with the foil and Chill for at least 4 hours before serving.  Keep the tiramisu chilled.
Enjoy a slice of tiramisu with a cuppa coffee.

To serve:

Trace the sides with a spatula to separate the cake from the foil. Remove the tiramisu cake by lifting the foil and transfer it on to a cake board. Gently remove the foil. Cut in slices and serve.  When the cake is not consumed in one setting, cover the sides with plastic. This will prevent the cream from absorbing the odors and bacteria from the fridge.

I think a cuppa coffee is a must.

Note, thanks to that cake shop who sells nice looking tiramisu, I made one myself the way I like it.


Thursday, March 10, 2011

Chicken Pop Corn


Chicken Popcorn

The nostalgia…
This post brings me back to the years when my brother cez and I used to have KFC Chicken Popcorn in Abu Dhabi when ever we pass by KFC, we always get 1 large box of chicken popcorn and share over a chit-chat break; digging our fingers alternatively in that box that our hands barely fit in. We both just love it every now and then.  We were just one sweet couple in that place and everybody is buzzing that brother Cez got a girlfriend! We just exchange smiles to let them believe so and we laugh it out loud after..  Yeah, those were the moments.. Chicken Popcorn moments.
Chicken Cubes coated in
bread crumbs

Cooking this at home, makes me miss u much brother. Hope we get to catch up each other soon.

Chicken Popcorn was one of my favorite take-away finger foods of KFC-Abu Dhabi.  Other KFCs from other countries are not making chicken pop corn, so it has been a while for me that i didn't get to taste this crispy on the outside and soft inside, popcorn shaped chicken.

The Recipe
Chicken breast, cut into cubes
Bread crumbs
Salt and pepper to taste
Oil for deep frying

Cooked chicken popcorn
drained in kitchen paper towel
There’s nothing to be precise about measurement, you just have to estimate the proportion of bread crumbs according to the amount of chicken.

Season chicken breast with salt and pepper, toss it into a bowl of bread crumbs to coat the chicken and deep-fry by batches.  Fry in low fire until golden brown. Drain in Kitchen Paper Towel so that oil will will be absorbed and keeps the chicken popcorn from getting soggy.

If I am in Phil, I'll be tempted to add into the breadcrumbs some seasoning like, crispy fry or magic sarap just because there is.  Here, I don't stock them in the pantry so I wont be tempted to use ready-made seasonings with MSG.

Wednesday, August 20, 2008

Curried Seafood Pasta


Curried Seafood Pasta

Once in a while me and hubby crave for spicy and aromatic foods that reminds us of our days in India. Yes, we had lived there for 6 months. Before we had our apartment we lived in a hotel for a month with inclusive of dinner buffet. We were both not new to Indian food since we had also both lived in U.A.E. where Indian restaurants are just everywhere, but to some point, when we were in India, having all Indian food every night at the buffet table with the entire spicy aroma around the dining hall it lingers to your shirt and even to the room. At the end of the day, you smell spicy as well. Lols

I think we both have explorative palates, we try some of the dishes that are unfamiliar to us, knowing that it is served the buffet gives us confidence that the food is safe. So we did tried several foods that are new to our senses, new to our eyes and nose and the stomach have no choice for that matter. Anyways, the bottom line of the adjustment in terms of food you know when it comes out the other way in the morning. When there’s no problem, it’s ok. At times it became a daring game for us who has a tougher stomach. Despite few stomach upsets, overall I love the experience.

Well, I’m truly amazed of the diversity of food that this world has to offer. Depending on where you are. The challenge is to enjoy, savor the local flavors wherever you are.

And this dish is an Indian influence to us, which we crave for from time to time. It is creamy and spicy at the same time.

Ingredients

2 large onions (Sliced)

3 cloves garlic (Diced)

200 g. squid (cut into rings)

200 g. Shrimps (shelled and deveined)

300 ml coconut milk

200 g. fish curry paste

1 tsp. chili flakes (optional)

Parsley (finely chopped)

Pasta

Salt and pepper

Procedure:

Cook pasta until al dente. While cooking the pasta, in a medium fire, sauté garlic and onions until onions become translucent. Add shrimps and squid until all the liquid has evaporated stirring from time to time. Add fish curry and chili flakes paste and continue stirring. Lastly, add coconut milk. Reduce fire and simmer for 2-3 minutes. Add pasta and mix with the sauce until well absorbed. Season with salt and pepper. Lastly, add parsley just before serving. Serve while still hot.


Friday, February 08, 2008

French Apple Tarte - Tarte Aux Pommes -


Apple Tarte

It’s my first successful tarte ever! I finally had perfected the sweet pastry crust where usually I go wrong. I had a number of mistakes with the temperature and the pastry recipe itself. I had overly sweet crust, burnt crust, or tough crust as hard as stone! So I did not make tarte for ages after those attempts. Now, I’m challenging myself to do it, and this time I couldn’t be prouder with the success. Finally! It turned out great. But the pastry crust is just one story.


I got the recipe of Tarte Aux Pommes - French Apple Tart from TEA CONCEPTS.

The first time I read it, I have no idea what is a pastry cream. So then, it took me a little digging up of what it is and found out that it is like a custard with creamy spreadable consistency. A little bit thicker than custard. I can’t find a certain recipe for pastry cream, so I made my own custard and just mixed it with a little cornstarch to make it thicker. With my French hubby as my reference and a little bit of research about pastry cream, I had an idea what to do because, I’ve been making custard since before. It worked quite well. Something new I learned from this recipe.


I have a few deviation of the original recipe as per my preference. I preferred to use margarine than butter for the sweet pastry dough, increased ½ cup the amount of flour, and used icing sugar instead of normal refined sugar. I preferred icing sugar because the sweetness is not overpowering and it has this subtle sweetness that just melts in your mouth, (as long as you don’t put too much) and as far as I have experienced icing sugar helps make dough more crumbly. Another alteration is I pre-baked the crust and sprinkled with cinnamon powder instead of sugar.

Here’s my version of the recipe with my alterations.

Apple Tarte

Ingredients:
4 green apples
1 cup Pastry cream (cooled)
Sweet pastry dough
Cinnamon powder
Pastry Cream:
3 eggs
1 cup milk
3 Tbsp. sugar
1 tsp. cornstarch (mixed with 2 Tbsp. milk)
2 tsp. vanilla essence

Sweet Pastry Dough
½ Cup and 1 Tbsp. margarine
½ cup icing sugar (sifted)
1 egg
2 ½ Cup All Purpose Flour
1/8 tsp. baking powder
1 tsp. vanilla essence

Procedure:

Make the Pastry Cream:
1. In a bowl, beat eggs and sugar lightly until well mixed.
2. Heat 1 cup of milk in a sauce pan until just before it comes to a boil.
3. Gradually add the warm milk to the egg mixture whilst beating continuously.
4. Place the mixture back to the pan return to the heat (very low heat) and continue mixing, taking care not to bring the mixture to a boil to avoid curdling. (if it boils, it will make the eggs scramble)
5. Add cornstarch mixture (1 tsp. cornstarch and 2 Tbsp. milk)
6. Continue mixing over low heat until the mixture becomes thick.
7. Set aside to cool, and chill in the refrigerator.

Make the Sweet Pastry Dough:
1. In a mixing bowl, mix margarine and icing sugar until creamy, add eggs and mix for another minute until soft and creamy.
2. Add flour and baking powder. Continue beating.
3. Add vanilla essence
4. Bring the mixture altogether to form a dough and mix with the hand.. Form the dough into a ball, Cover with Clingfilm and refrigerate for an hour.

Preheat oven to 375 degrees F.
Peel apples in half and remove the core.
Slice apples lengthwise as thinly as possible and set aside
Remove the dough from the refrigerator and knead for a few minutes on a lightly floured surface.
Flatten the dough into 5mm thick.
Roll out dough with a rolling pin onto a pie pan.
Press the dough to form the pattern of the pan. Bake for 10 minutes.
Remove from oven to cool down, chill in the freezer for 10 minutes. Remove from freezer.
Spread the cooled pastry cream over the base of the pastry shell.
Arrange the sliced apples on top of the pastry cream.
Glaze with melted butter
Sprinkle cinnamon powder on top.
Bake for about 45-50 minutes until the apples are caramelized and crust turns golden.
Turn off heat and allow to cool down before removing the tarte from the pan.
Use a dinner plate to flip over and another dinner plate to flip over again so that the tart shows its top.

Monday, February 04, 2008

Pavlova with Strawberries and cherry


Pavlova – Strawbery and cherry

I’ve been wondering what to do for dessert for a birthday dinner and I’d wanted to try something that I haven’t done before. My inspiration is from a fellow food blogger Margaret of KITCHEN DELIGHTS. Her Kiwi and Passion Fruit mini pavlovas inspired me to do this. My version is a little bit bigger than Margaret’s, as I made 1 pavlova per person.

Although I had pavlova before, made by hubby but I wasn’t so curious by then until now. I can’t find kiwi and passion fruit in the market but I got cherries and strawberries instead. It turned out great but first, it took me a little research on the dessert.

I think its worth to have a little bit of history of this dessert.

Pavlova is a popular merigue dessert in Australia and New Zealand to which both countries believed to have claimed the origin of the dish. The dish is named after Anna Pavlova, a Russian ballet dancer, who had a tour in 1926 and 1929. She was a famous ballerina of her time and her dances best described as light and airy, just like the dessert. Hence, the famous dessert “Pavlova” was named after her.

Well, after knowing such, its time to get to work! Do it!

The good thing with this dessert is you can make the base which is the meringue in advance and just add the whipped cream and the fruits just before serving.

If you have been working with meringue before, you must have been familiar with the stages of the egg white when beaten. Say “soft peak” and “Stiff” stages are very important as to when to start adding sugar and when to stop beating.

Make the meringue:
Ingredients:
4 egg whites
1 pinch cream of tartar, (alternatively salt can be used)
2 tsp. vinegar
1 ½ cup sugar
2 tsp. corn starch
1 tsp. Vanilla essence


Procedure:

1. Preheat oven to 180 degrees C. (Gas 4)
2. Cut baking paper into 5 inch squares (make 6 squares)
3. Draw a circle at bottom side of the baking paper. Use this as a guide when you put meringue in each portion. Set aside.
4. In a dry clean bowl, place the egg whites and cream of tartar.
5. Beat the egg white using electric beater until soft peak
6. gradually add sugar whilst continue beating until
7. Add vinegar and cornstarch
8. Add vanilla essence
9. continue beating until stiff. The meringue must look smooth, silky and holds a stiff peak when you lift the beater.
10. In the prepared baking paper, spoon in the meringue making a circular pattern as per the guide, working from the center, create a small well and spread the meringue to the edge of the pattern.
11. Pipe around the meringue to create a little well, where you will put the whipped cream later on.
12. Bake for 1 hour and half. Turn the oven off and leave the meringue to cool completely inside the oven. It is best to do this at night and leave the meringue in the oven overnight. The meringue should be firm and crisp.
13. Store the meringue in an airtight container until you will use them.


Assemble the Pavlova

1. Whip the cream until soft peak. Sprinkle 2 Tbsp. of icing sugar, beat for few seconds more.
2. Spoon in the whipped cream on top of each of the prepared meringue
3. Place the desired fruit on top of the cream
4. Serve immediately.

Tuesday, January 15, 2008

Mutton Sio Mai


Mutton Sio Mai

We are a big fan of dim sum restaurants and once in a while at home we crave for it. The key to a tasty dim sum dumplings is to cook with a bamboo steamer. I have tried doing it in my metal steamer, there’s nothing like it with a bamboo steamer! It’s the flavor and the aroma that has stucked into it that gives a special touch. In my quest to find a bamboo steamer, I’ve been to china town, but wasn’t successful. I’ve seen huge gigantic bamboo steamer which is not what I’m looking to buy! Not until now, a colleague of hubby was kind enough to buy it for us, and we are very pleased to have a medium sized bamboo steamer in four layers. We just got it last night and we wanted to try it right away! Just in time, I have frozen dumpling wrapper which have been sitting in the freezer for quite some time now, But the available minced meat I have is mutton and mutton only! I haven’t had mutton sio mai in my life, but that didn’t leave me any much choice but to try making mutton sio mai. My imagination had worked fantastically with the flavors, hence I put spices that I haven’t used with chicken or pork dumplings. I added chili onion, mushrooms which worked out just well!

Ingredients:
¼ Kg minced mutton
1 can button mushrooms (diced finely)
1 large white onion (diced finely)
1 red chili (diced finely)
1 green chili (diced finely)
6 Tbsp. Soy sauce
1 Tbsp. sesame oil
2 Tbsp. corn starch

Soy Sauce:
¼ C. Soy sauce
2 Calamanci (small lime)
½ tsp. Sesame Oil

Procedure:

Prepare all the ingredients and place everything in a mixing bowl. Mix vigorously with your hand, you may wish to use plastic gloves, as I did, until all the flavors have been blended together. Let it stand for about 10 minutes that the flavors will develop nicely.

Place 1 teaspoon of meat mixture at the center of each dumpling wrapper, pat with water around the meat using your finger. Gather the edges of the wrapper up forming pleated raffles. Tap on the table to flatten the bottom of the siomai and squeeze a little just before the edge of the wrapper, leaving a little meat exposed. Do this until all the meat mixtures have been wrapped, then you are ready to steam.

To use the bamboo steamer, place about an inch deep of water in a large woke, taking care that the water should not get out of the rims of the steamer. This is important to keep the steam inside the bamboo steamer. Bring the water to boil and reduce the heat when it is bubbling already. Brush with the base of the bamboo steamer to avoid the dumplings sticking onto it. Place the dumplings in each base keeping a little distance in between each dumpling.


Stack the bamboo steamer over the simmering water and cover the last layer.


Cook for 15 minutes. Serve with soy sauce.

This siomai is just perfect to our taste, and I shall do it again! It’s even better than what I have tasted in the food court of KLCC which was a little bit commercialized, I should say.

Hubby was so impatient infusing flavor and aroma with the new bamboo steamer, he steamed by adding onion, garlic to the water instead of just plain water, I find it a brilliant idea. Hence, now we have a bamboo steamer that smells like it is used since a long time.

I have posted Chicken Siomai long time back, say 2 years ago, when we were in Angola. I did it quite differently as I have to settle what I can find there, and I even used bread crumbs coz I cant find cornstarch in the supermarket, and I remember there is no available sio mai wrapper there, so I used the spring roll wrapper instead and cut them into small pieces. Those were the days when I was living in (T.I.A.) which means “This Is Africa”. I tell you, it was not easy!

Monday, January 29, 2007

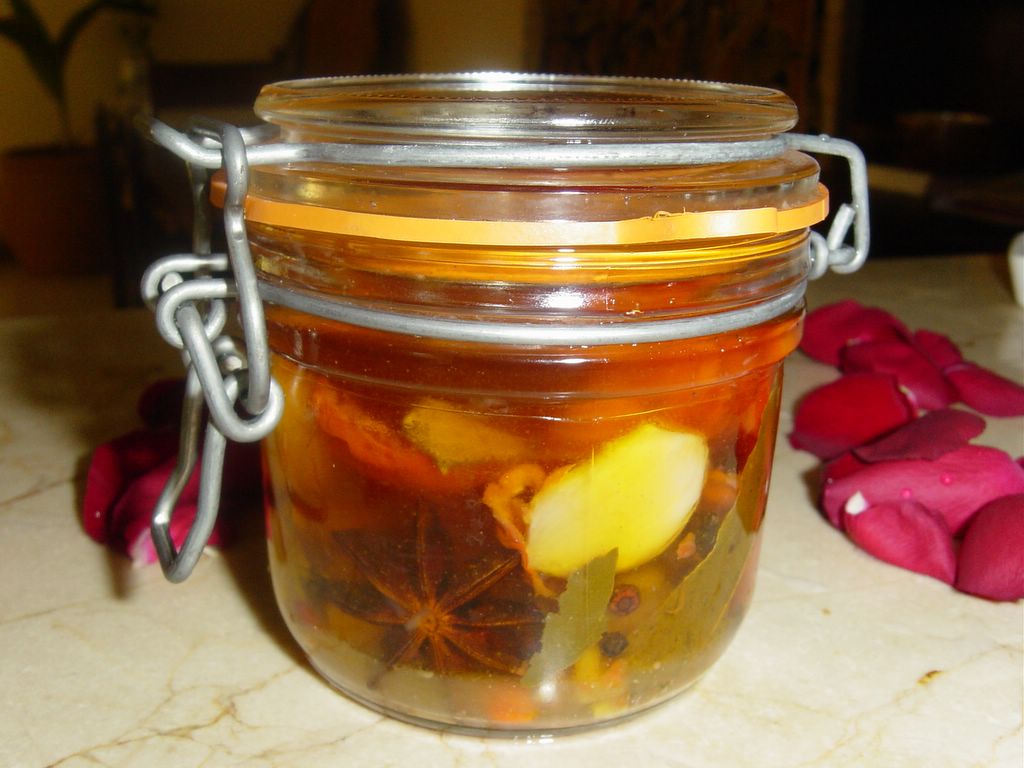
Gidunggo (Flavored oil)


Gidunggo (Flavored oil)
This is exotic flavored oil smells devine with just the right amount of hotness of various chilli.Just soft enough for everybody's taste.
Ingredients :
2 Cup Olive oil
3 grated Carrots
1 Piece red bell pepper
2 whole pieces star anise
6 cloves garlic
2 pcs. bay leaves
6 pcs. small red chilli
1 tablespoon whole black pepper
1 teaspoon whole white pepper
Procedure:
Heat olive oil in a pan and add carrots. Fry carrots until crisp and drain. Discard the crispy carrots and keep the oil. Put all of the other ingredients in a bottle and add the hot carrot oil. You may add various kinds of chilli according to your liking. Store in room temperature. This oil is smells so great! You can use it to flavor the oil you are using for sautee or you may serve it directly to the table as an optional flavor. This really adds an appetizing taste to your dish, may it be sallad or meat. Anybody can just add the right amount of oil on their food while eating! which my husband loves to do... Actually I've learned this from my husband and modified a bit from his original gidunggo.. This is famous in Angolan cuisine. Enjoy!

Wednesday, January 24, 2007

Choucroute


This is one of my unforgettable dish when we visited a friend in France. Choucroute is a typical Alsatian dish. It is made up of salted cuts of pork,bacon, sausages, potatoes and fermented cabbage.

Monday, December 11, 2006

Steak Tartar


Steak Tartar

One of the most unforgettable dish that I love in Paris. At first I was quite hesitant to have it because it is fresh ground meat, fresh as in raw meat! But then I was quiet relieved when hubby explained to me how strict the Department of Health in France is when it comes to meat products. He convinced me about sanitary issues so I did try.

The steak tartar was prepared in corner of the restaurant where it is visible to the diners. On top of a small table were the ingredients, namely; capers, finely chopped onion, egg yolk, worcestershire sauce, dijon mustard,yellow mustard, raw minced beef, freshly ground black pepper and salt. The waiter just simply mixed all ingredients in the bowl by making a well at the center of the minced meat, add the yolk, capers and mustard and mixed it vigorously with 2 forks and folding in the meat. With the pepper grinder,the waiter added pepper and salt every now and then to season the meat nicely and finally, added a splash of cognac. In 3 minutes, the steak tartare was ready infront of me! That was quick and easy! It tastes delicious! I'm surprized how fresh the meat was. It doesnt smell like meat at all but the taste was great! The sharp taste of the dijon mustard and other mild flavors in it is just so nice. Well, I ended up loving it and in fact I made it the point to be the last meal I had before I left Paris.

It is something I couldn't have in Philippines unless I grow my own cow and be there the moment it is butchered and make the tartare right away! You know what I mean? The tropical temperature in Philippines makes meat rancid quicker than in cooler countries.

Friday, November 25, 2005

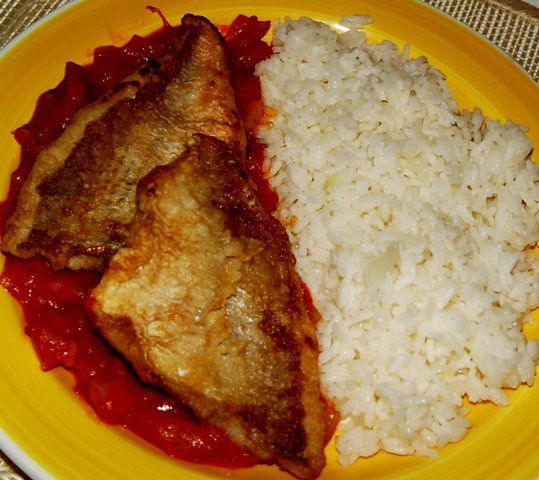
Peixe com mollo de tomate


Peixe com mollo de tomate
(Fish with tomato sauce)

This dish is an influence from our helper here, who is an Angolan, she made me once a very nice fish with tomatoe sauce. We have the same dish in Philippines called sarciado. The difference is sarciado sauce is with egg. Considering of skipping eggs, I think it would be healthier without egg this time as I’m using eggs for desserts, being conscious of cholesterol. :-)

Ingredients:

2 fish fillet
2 onions (sliced in cubes)
1 clove Garlic (finely chopped)
5 large tomatoes (quartered)
2 Tablespoons oil
2 tablespoons tomatoe paste
½ cup water
2 Tablespoons flour
2 Tablespoons corn starch
Oil for frying

Procedure:

Mix flour and cornstarch in a plate. Coat fish with the flour mixture and fry 2 – 3 minutes each side. Set aside

In a casserole, sauté garlic and onion in 2 tablespoons oil until translucent. Add sliced tomatoes and stir occasionally until tomatoes are wilted. Stir in tomato paste and add water gradually. Bring to boil and simmer for 5 minutes or until liquid has reduced. Season with salt and pepper.

Serve fish on top of tomato sauce and plain rice. In Portuguese its called “peixe com mollo de tomate com arroz branco”.


Popular Posts